OLD Bare Metal System Image: Difference between revisions
No edit summary |
No edit summary |
||
| Line 82: | Line 82: | ||
Here are some miscellaneous settings I think are a good idea for an OpenMower install. | Here are some miscellaneous settings I think are a good idea for an OpenMower install. | ||
Disable unattended upgrades: | |||
sudo apt remove unattended-upgrades | |||
=== 4. Enable Swap (optional, needed for Pi with <= 2GB RAM) === | === 4. Enable Swap (optional, needed for Pi with <= 2GB RAM) === | ||
Compiling the OpenMower software will need more than 2GB of RAM. In order to still do this on a Pi with <= 2GB of RAM, we will add a 2GB swap file to the system by entering the following commands: | Compiling the OpenMower software will need more than 2GB of RAM. In order to still do this on a Pi with <= 2GB of RAM, we will add a 2GB swap file to the system by entering the following commands:<syntaxhighlight lang="bash" line="1"> | ||
# Create a new 2GB swap file | |||
sudo fallocate -l 2G /swapfile | |||
# Change permissions, so that only root can read and write | |||
sudo chmod 600 /swapfile | |||
# Create swap space in the file | |||
sudo mkswap /swapfile | |||
# Add it to the fstab | |||
echo '/swapfile swap swap defaults 0 0' | sudo tee -a /etc/fstab /swapfile swap swap defaults 0 0 | |||
# Reboot to activate | |||
sudo reboot | |||
# Check if it's activated | |||
sudo swapon --show | |||
</syntaxhighlight> | |||
=== | === 5. Installing a WiFi Hot-Spot (optional, but recommended) === | ||
As soon as you have closed your mower's enclosure, you won't have physical access to your Raspberry Pi anymore. If for some reason it's unable to connect to your WiFi (e.g. you have changed your password), you would need to open the case to get access to the SD card or Ethernet port on the Pi to regain access. | As soon as you have closed your mower's enclosure, you won't have physical access to your Raspberry Pi anymore. If for some reason it's unable to connect to your WiFi (e.g. you have changed your password), you would need to open the case to get access to the SD card or Ethernet port on the Pi to regain access. | ||
Revision as of 21:06, 6 June 2022
This page will guide you through the steps to install a basic system image.
On this image you will have the ROS base system, the OpenMower installation, local configuration for your mower and some tools to help you work with the mower.
Prerequisites
In order to follow this guide, you will need the following:
- A Raspberry Pi 4 (4GB or more recommended, 2GB works with swap, see below)
- An SD card
- A soldered OpenMower mainboard
Installing the Base System
There is also a YouTube video explaining the steps in this section: https://youtu.be/_bImqD-pQSA?t=562
1. Flashing Ubuntu to SD Card
The first step is to install the base system. We're using Ubuntu 20.04 Server for the Raspberry Pi. This is, because this image gives us best support ROS Noetic.
Installing the base image is easy:
- Get the Raspberry Pi Imager software [1]
- Select the correct operating system: Other-general-purpose OS > Ubuntu > Ubuntu Server 20.04.4 LTS (RPI 3/4/400)
- Insert your SD card into your PC and select it in the Storage part of the software
- Click write and wait for the process to finish
Once you have successfully flashed your image, remove the SD for your PC and reinsert it again.
Then replace the /boot/config.txt file with the one provided here: [2]
This will enable all hardware serial ports on the Raspberry Pi.
Note:
You can theoretically configure networking in this step as well, but I'm not recommending it. This is, because the networking information file gets only copied once and if you have an error it won't work. We need an interactive terminal in the next step anyways.
Once you have done this step, you can eject the SD card and plug it into your Raspberry Pi 4.
2. Opening a Serial Terminal

This step is needed for the following sections. The goal is to have a serial terminal to do basic config (networking etc) easily.
The easiest way of doing so is:
- Flash the SerialRedirect firmware into your Pico. Get it here: https://github.com/ClemensElflein/OpenMower/tree/main/Firmware/SerialRedirect/bin
- Provide your mainboard with power
- Plug your Pico into a computer. A virtual COM port should appear
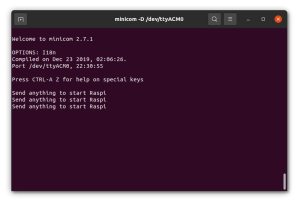
- Connect to the COM port (I'm using minicom, see image on the right), then press enter to start the Raspberry Pi.
- The Pi boots and a serial terminal will appear.
Now you can login with the default credentials:
username: ubuntu
password: ubuntu
Note that you will need to change the password immediately.
3. Disable Boot Interrupt

The Raspberry Pi boot loader will interrupt the boot sequence if data is sent through the main serial port of the Raspberry Pi. Since we're connecting "nosiy" hardware to the port, this will always interrupt the boot sequence and we need to disable this feature.
In order to do this, reboot the Pi (sudo reboot) and send anything during the count-down in the bootloader (check the YouTube video linked above, if you're not sure).
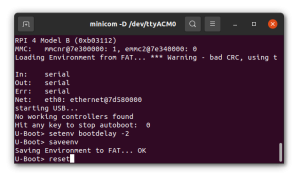
Then enter the following commands into the bootloader prompt:
setenv bootdelay -2
saveenv
reset
The Pi should reboot and the count-down should be gone.
4. Some Settings
Here are some miscellaneous settings I think are a good idea for an OpenMower install.
Disable unattended upgrades:
sudo apt remove unattended-upgrades
4. Enable Swap (optional, needed for Pi with <= 2GB RAM)
Compiling the OpenMower software will need more than 2GB of RAM. In order to still do this on a Pi with <= 2GB of RAM, we will add a 2GB swap file to the system by entering the following commands:
# Create a new 2GB swap file
sudo fallocate -l 2G /swapfile
# Change permissions, so that only root can read and write
sudo chmod 600 /swapfile
# Create swap space in the file
sudo mkswap /swapfile
# Add it to the fstab
echo '/swapfile swap swap defaults 0 0' | sudo tee -a /etc/fstab /swapfile swap swap defaults 0 0
# Reboot to activate
sudo reboot

# Check if it's activated
sudo swapon --show
5. Installing a WiFi Hot-Spot (optional, but recommended)
As soon as you have closed your mower's enclosure, you won't have physical access to your Raspberry Pi anymore. If for some reason it's unable to connect to your WiFi (e.g. you have changed your password), you would need to open the case to get access to the SD card or Ethernet port on the Pi to regain access.
To prevent this, we're going to install a hot-spot software which helps you to connect to WiFi by opening a hot-spot each time the Pi cannot connect to a known WiFi connection.
Now is the best time to do this, because we have a serial terminal anyways and can mess with the network interfaces without shutting us out of the system!