Running OpenMower
Now that you have your hardware assembled and the basic software installed on your mower, we can calibrate the magnetometer and start recordings maps and mowing the lawn.
Prerequisites
In order to follow this guide, you will need the following:
- A mower modified to run the OpenMower software
- A working system image, where you can run the OpenMower software
- An ssh connection to your mower
- An Xbox GamePad
- Some source for RTK corrections, I'm using a local base station for this.
- Optional, but very useful: A Linux PC where you can run RVIZ to visualize what your mower is doing
Test Setup for this Guide


Hardware Used
For this guide, I'm using the following setup:
- YardForce Classic 500 mower with OpenMower Mainboard and system image as described here which is connected to a router via WiFi
- A local RTK base station connected to a router via ethernet
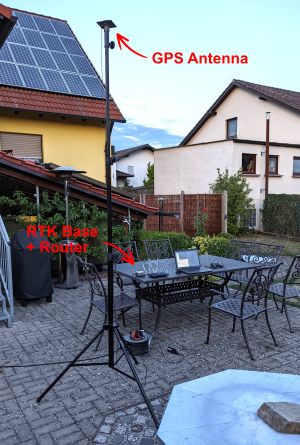
- A GPS antenna on a large tripod (~3 m height) connected to the RTK base station
- A PC connected to the same network for testing
- I am using a relative coordinate system for positioning (check mower_config.sh, if you are not sure about that)
Network Configuration
I have used a static IP configuration with the following settings: RTK base station:
- Hostname: rtkbase.local
- IP-Address: 192.168.0.100
Robot:
- Hostname: openmower.local
- IP-Address: 192.168.0.101
Connect the Components
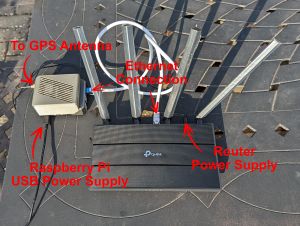
First connect the components like it is shown in the pictures on the right. The GPS antenna is connected to the Raspberry Pi base station. The RaspberryPi GPS base station is powered via USB-C power supply and is connected to the router via ethernet. The router needs to be powered as well using the included power supply. My laptop and the mower are both connected to the router via WiFi.
Testing the Connection
After connecting the components as described and powering everything, make sure that the network connection works as expected. To do this ping the base station and the mower from your PC using both the IP address and their hostname. If both works, the network setup is successful.
Testing RTK GPS
Once you have confirmed, that the network is working correctly, test the RTK GPS. Do this by connecting to your mower using two separate ssh sessions: one for starting the OpenMower software and the other one for looking at the GPS data.
In the first terminal, start the GPS communication part of the OpenMower software by typing roslaunch open_mower _gps.launch. You should see some console output.
In the second terminal, run rostopic echo /ublox/navrelposned. There should be messages shown in the terminal. We are interested in the following fields of the message: TODO
Wait for the accuracy to reach the value of 100. Depending on your configuration, this might take some time. Wait at least 30 minutes before starting to debug anything. First time fix will take some time! If your accuracy number drops to 100 and is stable at this value, your RTK GPS is working as intended. If the values does not drop, there is an issue with the RTK setup.
If you are happy with your accuracy, stop the OpenMower software by pressing CRTL+C in your first terminal.
Magnetometer Calibration

After verifying, that the RTK GPS is working as intended, you will need to calibrate your magnetometer. This is important, because the magnets and metal parts embedded in the mower will interfere with the magnetic sensor. That's why it's important to do this after finishing the assembly!
In order to start magnetometer calibration, start the OpenMower software on the mower using ssh:
roslaunch open_mower _comms.launch
This will start the communication layer between ROS and the mower's hardware.
Now start a second terminal and ssh into your mower.
You can test, that the communication works by using the following command:
rostopic echo /mower/imu
You should now see the raw IMU data printed to the terminal. If this is not the case, you have an error in your setup.
Press CTRL+C to cancel the data display.
Now you can start the calibration process by entering:
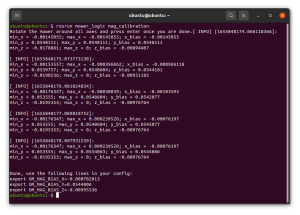
rosrun mower_logic mag_calibration
Now rotate the mower slowly around all three axes.
DON'T push the emergency stop button during the calibration. It has magnets embedded and will lead to wrong calibration.
As soon as you're finished, press the enter button. The final values are printed to the terminal.
Stop the first ROS process by pressing CTRL+C.
You can copy and paste the values into your mower_config.sh.
Now reload the mower_config.sh by entering:
source ~/mower_config.sh
Area Recording
Finally, you can record your mowing areas and the docking station position.
There is also a YouTube animation available, watch that first and then read the following text: https://www.youtube.com/watch?v=j7qkwuoHJpI
I recommend that you start with a simple area with lots of space around first. This way if something goes wrong, your mower won't instantly crash. You will need to record at least one area and your docking station in order to start mowing.
Overview
Basically, there are three things to record: The Navigation Area, Mowing Areas and the Docking Station position.
- The mowing areas are the areas which will be mowed by the mower. Each mowing area consists of an outline and optionally areas to avoid.
- The navigation area is the area which the robot may enter during navigation. This is needed to roam between mowing areas and also to find a way to the docking station, if it's not inside a mowing area.
- The docking station is defined by a position and an orientation. Since the orientation of the mower is not 100% perfect due to magnetometer noise, we'll record two points which are then connected by a line. The direction of this line determines the docking orientation. More on that later

Controls
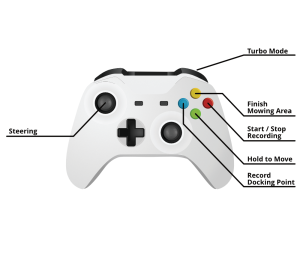
During recording mode, you can move the mower and control the recording process using the Xbox game pad:
- Hold A to move the mower using the left analog stick. Press RB for turbo mode.
- Press B to start / stop recording of the current polygon.
- Press Y + D-PAD UP to finish your current area and add it to the map as a navigation area. The robot is allowed to enter the area for navigation (e.g. driving to another area or to the docking station), but the are will not be mowed by the mower.
- Press Y + D-PAD DOWN to finish your current area and add it to the map as a mowing area. The robot will mow this area. You will need at least one mowing area, for the robot to work.
- Press X to record the first point of the docking position, Press X again to record the second position of the docking station and save it to the map.
You start and stop the recording mode using buttons on the mower:
- Press S1 to start the recording mode
- Press Home to stop the recording mode
Recording the Mowing Areas
At first I like to record the mowing areas. Start with one area which is obstacle free. As soon as you are more confident in the mower's positioning, you can add more areas complex areas which may also be close to obstacles.
In order to start recording an area, start the OpenMower software using:
roslaunch open_mower open_mower.launch
Before starting the recording, make sure that you have a good GPS fix. You can do that by using the following command in a second terminal:
rostopic echo /ublox/navrelposned/accLength
This will print the current GPS accuracy in 0.1 mm steps. At full accuracy, you should get a value of 100. If it is larger, check your GPS config!
Now, with the OpenMower software running and with a good GPS fix, you can start the area recording process. For this you will need a gamepad connected to your mower.
Start the recording process by either pushing the S1 button on your mower or by executing the following command in a terminal to simulate the button press:
~/open_mower_ros/utils/mower_buttons/press_s1.sh
You should now be able to move your mower using the GamePad (see controls section above).